
前回の記事からかなり経ってしまいましたね。(申し訳ない)
今回のテーマとしては「アンケート」です。
まぁ、これに関連するBotは既にありますが自分で作って使いやすいものにしていきましょう。
因みに既にあるアンケートBotはこれ!
[st-card-ex url="https://simplepoll.rho.sh/" target="_blank" rel="nofollow" label="" name="" bgcolor="" color="" readmore=""]
前回の記事はこちら!
[st-card-ex url="https://www.dice-programming-etc.com/c%e3%81%a7discord-bot%e9%96%8b%e7%99%ba%ef%bc%88discord-net%ef%bc%89/" target="_blank" rel="nofollow" label="前回の記事" name="" bgcolor="red" color="" readmore=""]
環境構築
詳しい環境の構築方法は前回の記事に書いてありますので、そちらを参考にして下さい。
開発環境
- OS:Windows10
- IDE:Visual Studio 2019
- 開発言語:C#
今回はアンケート機能を実装していきますが、最終的には機能をガンガン盛っていこうと思います。
さっそく開発開始
とりあえず、コマンドに返答しないことには意味ないので一旦コマンドを作りましょう。
メインの部分はこれでOKです。
重要になってくるのは56行目~です。
ここでメッセージを取得して処理しています。
これを使えるようにするために36行目で定義しています。
メッセージ受信部分についてはプログラム内に説明を直接書いています。
using Discord;
using Discord.WebSocket;
using System;
using System.Threading;
using System.Configuration;
using System.Threading.Tasks;
using Discord.Commands;
using Microsoft.Extensions.DependencyInjection;
using System.Reflection;

namespace AllBotApp
{
    class Program
    {
        public string token = ConfigurationManager.AppSettings["Token"]; // .net開発で用いる App.configを使用
        public readonly DiscordSocketClient _client;
        public static CommandService commands;
        public static IServiceProvider services;

        static async Task Main(string[] args)
        {
            new Program().MainAsync().GetAwaiter().GetResult();
        }

        public Program()
        {
            _client = new DiscordSocketClient();
            _client.Log += LogAsync;
            _client.Ready += onReady;
        }

        public async Task MainAsync()
        {
            commands = new CommandService();
            services = new ServiceCollection().BuildServiceProvider();
            _client.MessageReceived += CommandRecieved;
            await commands.AddModulesAsync(Assembly.GetEntryAssembly(),services);
            await _client.LoginAsync(TokenType.Bot, token);
            await _client.StartAsync();

            await Task.Delay(Timeout.Infinite);
        }

        private Task LogAsync(LogMessage log)
        {
            Console.WriteLine(log.ToString());
            return Task.CompletedTask;
        }

        private Task onReady()
        {
            Console.WriteLine($"{_client.CurrentUser} is Running!!");
            return Task.CompletedTask;
        }

        private async Task CommandRecieved(SocketMessage messageParam)
        {
            var message = messageParam as SocketUserMessage;
            Console.WriteLine("{0} {1}:{2}", message.Channel.Name, message.Author.Username, message);
            // コメントがユーザーかBotかの判定
            if (message.Author.IsBot) {
                return;
            }
            if (message == null) {
                return;
            }

            int argPos = 0;
            var context = new SocketCommandContext(_client, message);
            // コマンドかどうか判定(今回は、「!」で判定)
            if ((message.HasCharPrefix('!', ref argPos) || message.HasMentionPrefix(_client.CurrentUser, ref argPos))) {

                // 実行
                var result = await commands.ExecuteAsync(context, argPos, services);

                //実行できなかった場合
                if (!result.IsSuccess) {
                    await context.Channel.SendMessageAsync(result.ErrorReason);
                }
            }

        }
    }
}
コマンドを実装
今回のコマンドは「!」で反応するようにします。
とは言え、このままではコマンドは使えません。
ということでコマンド用のクラスを作成しましょう。
ファイル名は「CommandHandler.cs」で行きましょう。
一旦シンプルに「!ping」で「pong!」を返すようにしましょう。
using Discord;
using Discord.Commands;
using System;
using System.Collections.Generic;
using System.Threading.Tasks;

namespace AllBotApp
{
    public class CommandHandler : ModuleBase
    {
        /// <summary>
        /// [ping]というコメントが来た際の処理
        /// </summary>
        /// <returns>Botのコメント</returns>
        [Command("ping")]
        public async Task ping()
        {
            await ReplyAsync("pong!");
        }
     }
}
これでこんな感じにBotが動きますよ、と。
次にアンケート機能となるとSimpole pollでアンケート内容を表示するときに使うEmbedをコマンドで返すようにします。
Embedを実装しよう
Embedをとは?
Simple Pollで見るとわかりやすいですが、画像のやつですね。(選択肢は何となくですw)
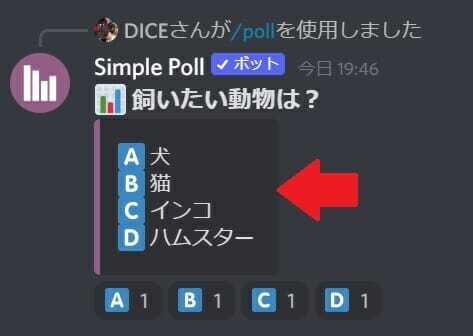
これを実装していきます。
実装しよう
先ほどの「ping」コマンドを改良しましょう。
改良したものがこちら
using Discord;
using Discord.Commands;
using System;
using System.Collections.Generic;
using System.Threading.Tasks;

namespace AllBotApp
{
    public class CommandHandler : ModuleBase
    {
        /// <summary>
        /// [ping]というコメントが来た際の処理
        /// </summary>
        /// <returns>Botのコメント</returns>
        [Command("ping")]
        public async Task ping()
        {
             var embed = new EmbedBuilder() // Embedのビルダーを宣言……面倒なのでBuild()まで含めてしまいます。
               .WithAuthor(Context.User.Username,  // ここでユーザー名とアイコンを取得
                           Context.User.GetAvatarUrl() ?? Context.User.GetDefaultAvatarUrl())
               .WithTitle("pong!") // タイトルを設定
               .WithDescription("これはテストです。") // 説明を設定
               .WithColor(Color.Red) //サイドの色を設定
               .AddField("Ping", "Pong!", true) // 項目を設定(複数可)
               .WithCurrentTimestamp() // 実行日時を追加
               .Build(); // ビルド
            await Context.Channel.SendMessageAsync(null, false, embed);
        }
     }
}
これで実行すると……。
こんな感じになります。
これを踏まえた上で、アンケート機能を実装しましょう。
アンケート機能を実装
簡単な仕様
この枠の中に表示する内容はこんな感じにしましょうか。
表示内容
- 実行ユーザーアイコン+名前
- 太字でアンケート内容
- 選択肢
- アンケートコマンド実行時間
選択肢の数は大文字アルファベットの数を上限としましょうか。
機能仕様はざっとこんな感じ!
簡単仕様
- 選択肢数の上限はA~Zの26文字
- Embedのサイドの色を設定可能にする
- メンション可能(@everyone)
- 項目は半角スペース区切り
- 重要度によって色分け
実装していこう
コマンド名はquestionから「que」としましょう。
先ほどのpingコマンドを実装したクラスに新しいメソッドを定義しましょう。
[Command("que")]
public async Task que(params string[] msg)
{
    // エモート用のリスト(リアクションを設定するときに使用)
    IEmote[] emotes = new IEmote[0];
    var embed = new EmbedBuilder()
       .WithAuthor(Context.User.Username,
                   Context.User.GetAvatarUrl() ?? Context.User.GetDefaultAvatarUrl());
  // 第一引数をタイトルとして設定。
    embed.WithTitle(msg[0]);
    // 念のためnullで初期化
    string description = null;
    // 表示する選択肢一覧をdescriptionに設定
    for(int i = 1; i < msg.Length; i++)
    {
        description += (new Emoji(iconUni[i - 1])).ToString() + msg[i]+"\n";
        // 選択肢一覧で使用した絵文字をエモートの配列に追加(この時配列をリサイズする)
        Array.Resize(ref emotes, i);
        emotes[i - 1] = new Emoji(iconUni[i - 1]);
    }
    embed.WithDescription(description);
    await Context.Channel.SendMessageAsync(null, false, embed.Build()).GetAwaiter().GetResult().AddReactionsAsync(emotes);

}
で、アイコンについてですが、グローバル変数に配列を用意してあらかじめ設定しておきます。
Unicodeの文字列を格納した配列です。これでA~Zの絵文字がそろっています。
string[] iconUni = { "\uD83C\uDDE6",
                     "\uD83C\uDDE7",
                     "\uD83C\uDDE8",
                     "\uD83C\uDDE9",
                     "\uD83C\uDDEA",
                     "\uD83C\uDDEB",
                     "\uD83C\uDDEC",
                     "\uD83C\uDDED",
                     "\uD83C\uDDEE",
                     "\uD83C\uDDEF",
                     "\uD83C\uDDF0",
                     "\uD83C\uDDF1",
                     "\uD83C\uDDF2",
                     "\uD83C\uDDF3",
                     "\uD83C\uDDF4",
                     "\uD83C\uDDF5",
                     "\uD83C\uDDF6",
                     "\uD83C\uDDF7",
                     "\uD83C\uDDF8",
                     "\uD83C\uDDF9",
                     "\uD83C\uDDFA",
                     "\uD83C\uDDFB",
                     "\uD83C\uDDFC",
                     "\uD83C\uDDFD",
                     "\uD83C\uDDFE",
                     "\uD83C\uDDFF" };

次はEmbedのサイドの色ですね。
これはカラーコードで設定できるようにしましょう。
カラーコード参考サイト
[Command("que")]
public async Task que(params string[] msg)
{
    IEmote[] emotes = new IEmote[0];
    string description = null;
    //------------------ 追加 -----------------------
    List<string> msgList = msg.ToList();
    string colorCode = null;

    for (int i = 1; i < msgList.Count; i++)
    {
        if (msgList[i].StartsWith("#"))
        {
            colorCode = msgList[i].Replace("\\","");
            msgList.Remove(msgList[i]);
            break;
        }
    }
    //------------------------------------------------
    var embed = new EmbedBuilder()
       .WithAuthor(Context.User.Username, // ここでユーザー名とアイコンを取得
                   Context.User.GetAvatarUrl() ?? Context.User.GetDefaultAvatarUrl());
    embed.WithTitle(msg[0]);
    //------------------ 追加 -----------------------
    if (colorCode != null)
    {
        var ccolor = System.Drawing.ColorTranslator.FromHtml(colorCode);
        embed.WithColor(new Color(ccolor.R, ccolor.G, ccolor.B));
    }
    //------------------------------------------------
    for(int i = 1; i < msgList.Count; i++)
    {
        description += (new Emoji(iconUni[i - 1])).ToString() + msgList[i]+"\n";
        Array.Resize(ref emotes, i);
        emotes[i - 1] = new Emoji(iconUni[i - 1]);
    }
    embed.WithDescription(description);
    await Context.Channel.SendMessageAsync(null, false, embed.Build()).GetAwaiter().GetResult().AddReactionsAsync(emotes);

}
実際に以下のコマンドを実行すると……
!que 飼いたい動物は? 犬 猫 インコ ハムスター #e4007f
じゃあ次は、@everyone ができるようにしよう。
@everyoneはそのままコマンドに含めてしまうと全員にメンションが行ってしまうので、少し対策しましょう。
「@」の代わりに「&」を使いましょう。
&everyoneに変更します。
実装方法は先ほどのカラーコードを指定する方法と同じ方法でやります。
[Command("que")]
public async Task que(params string[] msg)
{
    IEmote[] emotes = new IEmote[0];
    List<string> msgList = msg.ToList();
    string colorCode = null;
    // ↓追加
    Discord.WebSocket.SocketRole role = null;
    for (int i = 1; i < msgList.Count; i++)
    {
        if (msgList[i].StartsWith("#"))
        {
            colorCode = msgList[i];
            msgList.Remove(msgList[i]);
        }
        //------------------------------ 追加 -----------------------------------
        if (msgList[i].StartsWith("&") && msgList[i].Replace("&", "").Equals("everyone"))
        {
            role = Context.Guild.EveryoneRole;
            msgList.Remove(msgList[i]);
        }
        //-----------------------------------------------------------------------
    }
    var embed = new EmbedBuilder()
       .WithAuthor(Context.User.Username, // ここでユーザー名とアイコンを取得
                   Context.User.GetAvatarUrl() ?? Context.User.GetDefaultAvatarUrl());
    embed.WithTitle(msg[0]);
    if (colorCode != null)
    {
        var ccolor = System.Drawing.ColorTranslator.FromHtml(colorCode);
        embed.WithColor(new Color(ccolor.R, ccolor.G, ccolor.B));
    }
    //------------------------------ 追加 -----------------------------------
    if(role != null)
    {
        await ReplyAsync(role + "アンケートにお答えください。");
    }
    //-----------------------------------------------------------------------
    string description = null;
    for(int i = 1; i < msgList.Count; i++)
    {
        description += (new Emoji(iconUni[i - 1])).ToString() + msgList[i]+"\n";
        Array.Resize(ref emotes, i);
        emotes[i - 1] = new Emoji(iconUni[i - 1]);
    }
    embed.WithDescription(description);
    await Context.Channel.SendMessageAsync(null, false, embed.Build()).GetAwaiter().GetResult().AddReactionsAsync(emotes);
}
最後は重要度によって色分けする機能をつけましょうか。
重要度
- 高…$1
- 中…$2
- 低…$3
[Command("que")]
public async Task que(params string[] msg)
{
IEmote[] emotes = new IEmote[0];
List<string> msgList = msg.ToList();
string colorCode = null;
// ↓追加
Discord.WebSocket.SocketRole role = null;
for (int i = 1; i < msgList.Count; i++)
{
if (msgList[i].StartsWith("#"))
{
colorCode = msgList[i];
msgList.Remove(msgList[i]);
}
if (msgList[i].StartsWith("&") && msgList[i].Replace("&", "").Equals("everyone"))
{
role = Context.Guild.EveryoneRole;
msgList.Remove(msgList[i]);
}
}
//------------------------ 追加 --------------------------------
for(int j = 1; j < msgList.Count; j++)
{
if (msgList[j].StartsWith("$"))
{
switch (msgList[j])
{
case "$1": colorCode = "#ff0000";
break;
case "$2": colorCode = "#ffff00";
break;
case "$3": colorCode = "#00ffff";
break;
}
msgList.Remove(msgList[j]);
}
}
//--------------------------------------------------------------
var embed = new EmbedBuilder()
.WithAuthor(Context.User.Username, // ここでユーザー名とアイコンを取得
Context.User.GetAvatarUrl() ?? Context.User.GetDefaultAvatarUrl());
embed.WithTitle(msg[0]);
if (colorCode != null)
{
var ccolor = System.Drawing.ColorTranslator.FromHtml(colorCode);
embed.WithColor(new Color(ccolor.R, ccolor.G, ccolor.B));
}
if(role != null)
{
await ReplyAsync(role + "アンケートにお答えください。");
}
string description = null;
for(int i = 1; i < msgList.Count; i++)
{
description += (new Emoji(iconUni[i - 1])).ToString() + msgList[i]+"\n";
Array.Resize(ref emotes, i);
emotes[i - 1] = new Emoji(iconUni[i - 1]);
}
embed.WithDescription(description);
await Context.Channel.SendMessageAsync(null, false, embed.Build()).GetAwaiter().GetResult().AddReactionsAsync(emotes);
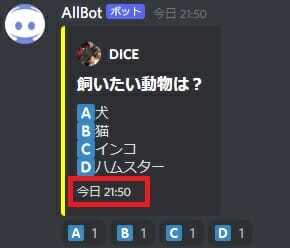
}例として重要度を「中」とした場合の実行結果です。
あ、時間の表示忘れてた。
Embedを送信する前にこれを入れてください。
embed.WithCurrentTimestamp(); // ←これ
await Context.Channel.SendMessageAsync(null, false, embed.Build()).GetAwaiter().GetResult().AddReactionsAsync(emotes);
こうなっていればOK
これで一通りが実装できましたね。
コマンドにはスラッシュコマンドについては以下の記事でまとめました!
[st-card-ex url="https://www.dice-programming-etc.com/c-sharp-discord-post-slashcommand/" target="_blank" rel="nofollow" label="スラッシュコマンについて" name="" bgcolor="red" color="" readmore=""]
まとめ
いかがだったでしょうか?
今回は簡単なアンケート機能の実装の身でしたが、なかなかにやりごたえがあったように感じますね。
今後、ドキュメントにある機能はある程度実装していこうと思うのでお楽しみに!